Reverse Proxy
Reverse proxy websites are used to forward external requests to backend services, commonly used for deploying Node.js, Go, Java, Python, and other applications.
How It Works
User Request -> Nginx (Reverse Proxy) -> Backend Application (e.g., localhost:3000)Nginx receives HTTP/HTTPS requests from users and forwards them to the specified backend address.
Create Reverse Proxy Website
- Go to the Website page
- Make sure the Reverse Proxy tab is selected
- Click Create Website
Configuration Items
- Name: Website identifier, e.g.,
myapp - Domain: Bound domain, e.g.,
app.example.com - Port: Listening port, default 80
- Proxy Target: Backend service address, e.g.,
http://127.0.0.1:3000 - Remarks: Optional remarks
Proxy Target Format
http://127.0.0.1:3000      # Local service
http://localhost:8080       # Local service
http://172.18.0.2:80        # Docker container
https://backend.internal    # Internal HTTPS service
Edit Reverse Proxy Website
Click the Edit button in the website list to enter the edit page.
Domain and Listen
Configure the website's domain and listening port, supporting multiple domains and ports.
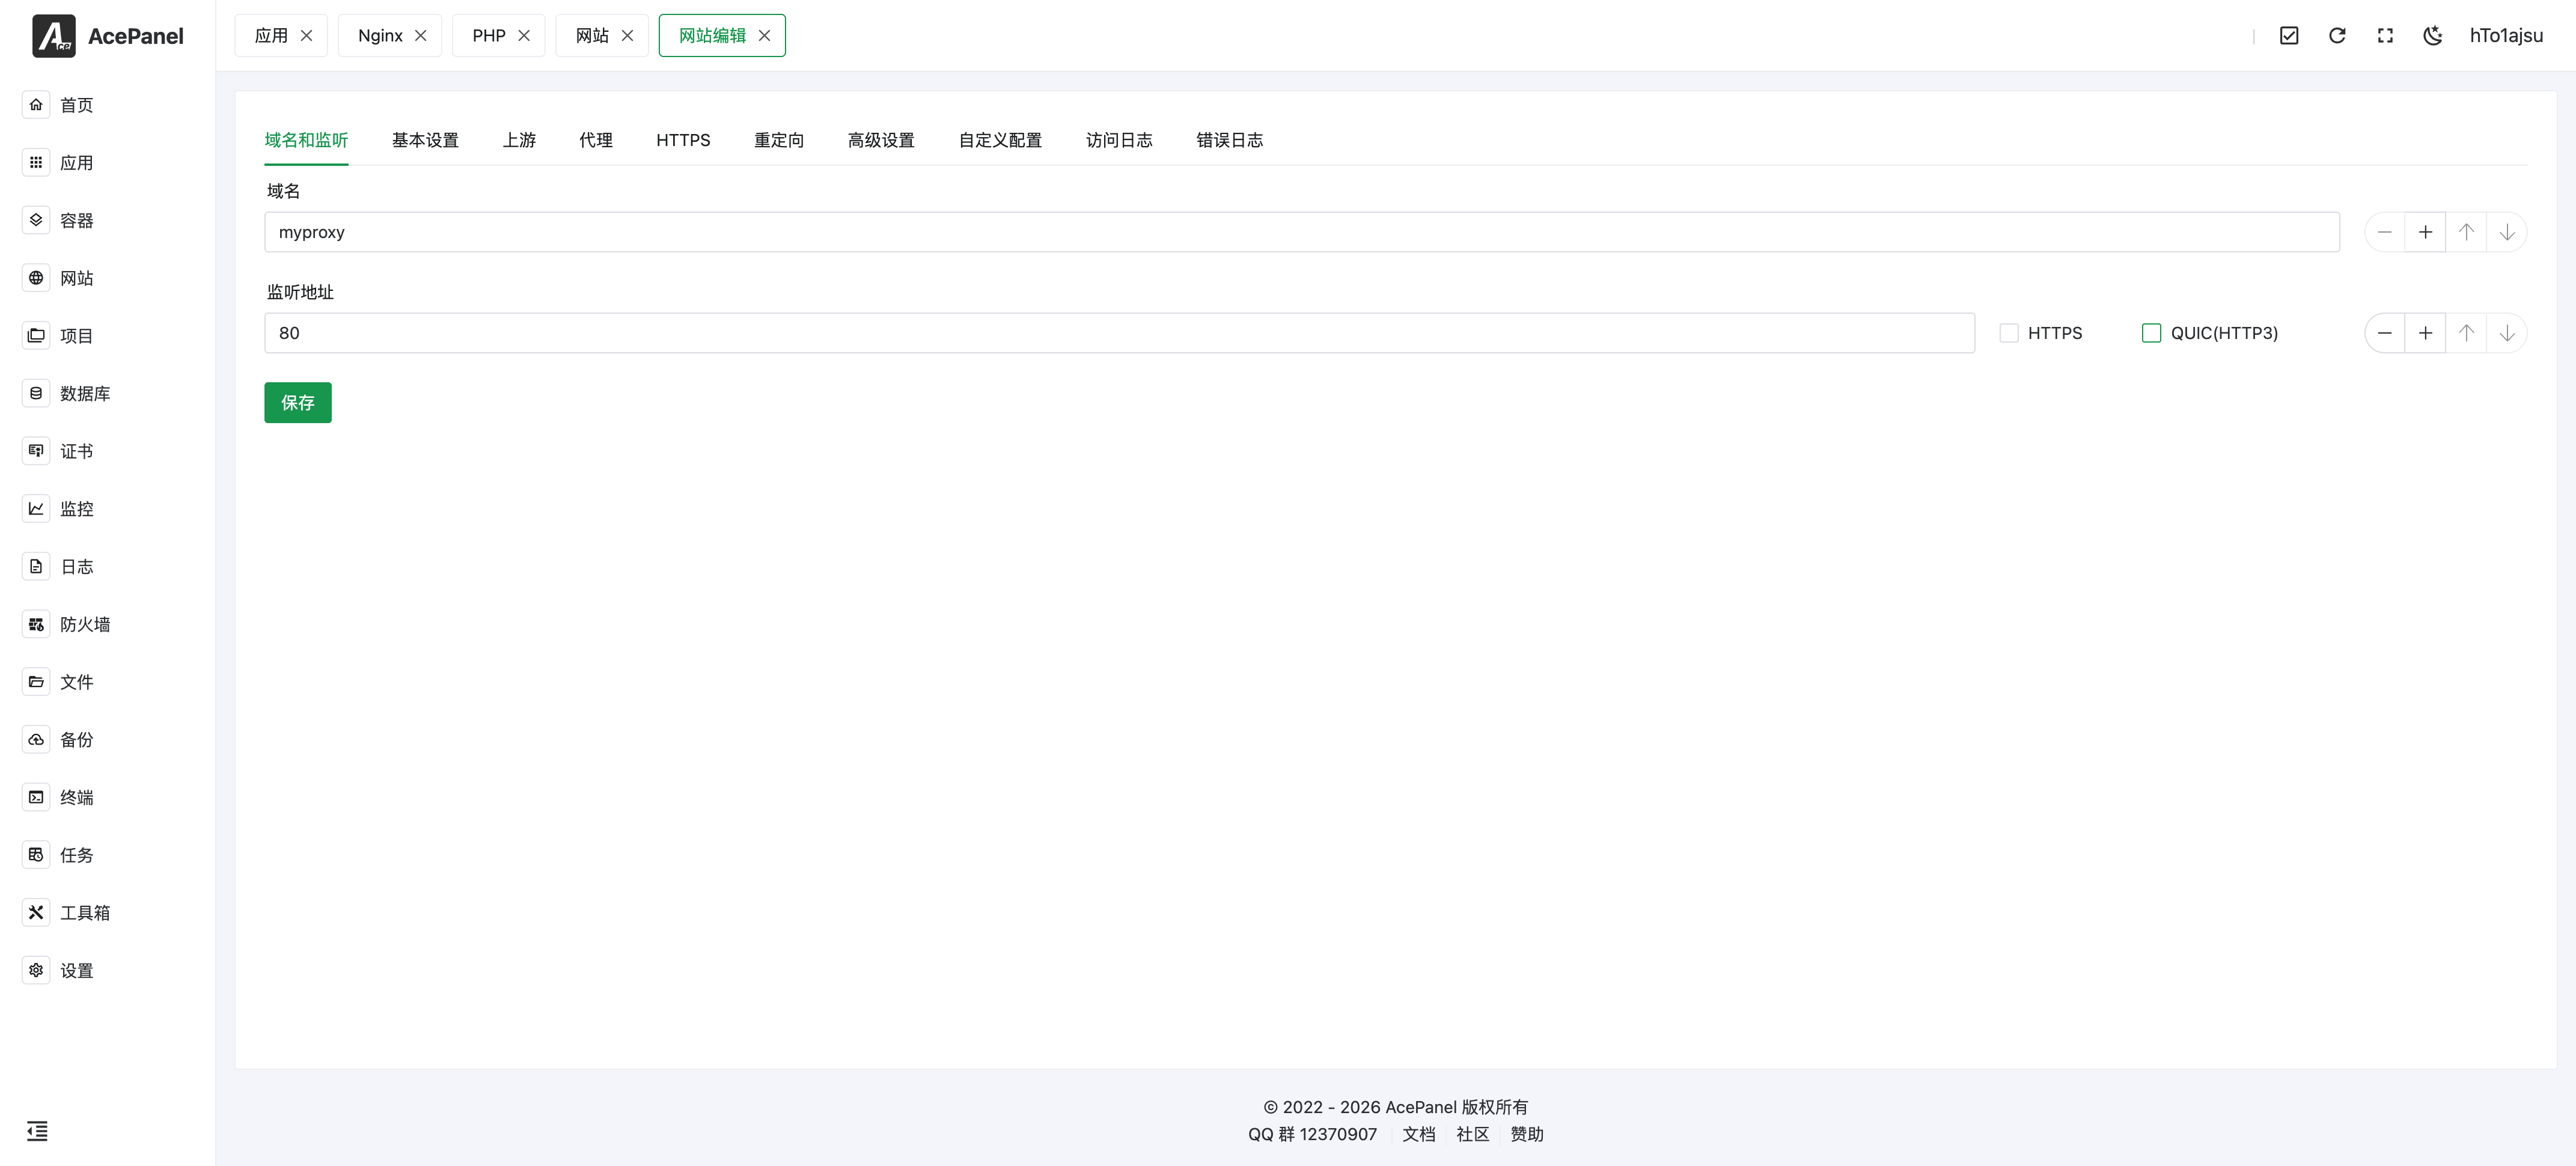
- Domain: Multiple domains can be added
- Listen Address: Multiple ports can be configured, supporting HTTPS and QUIC(HTTP3)
Upstream Configuration
Upstream defines backend server addresses, supporting multiple backends for load balancing.
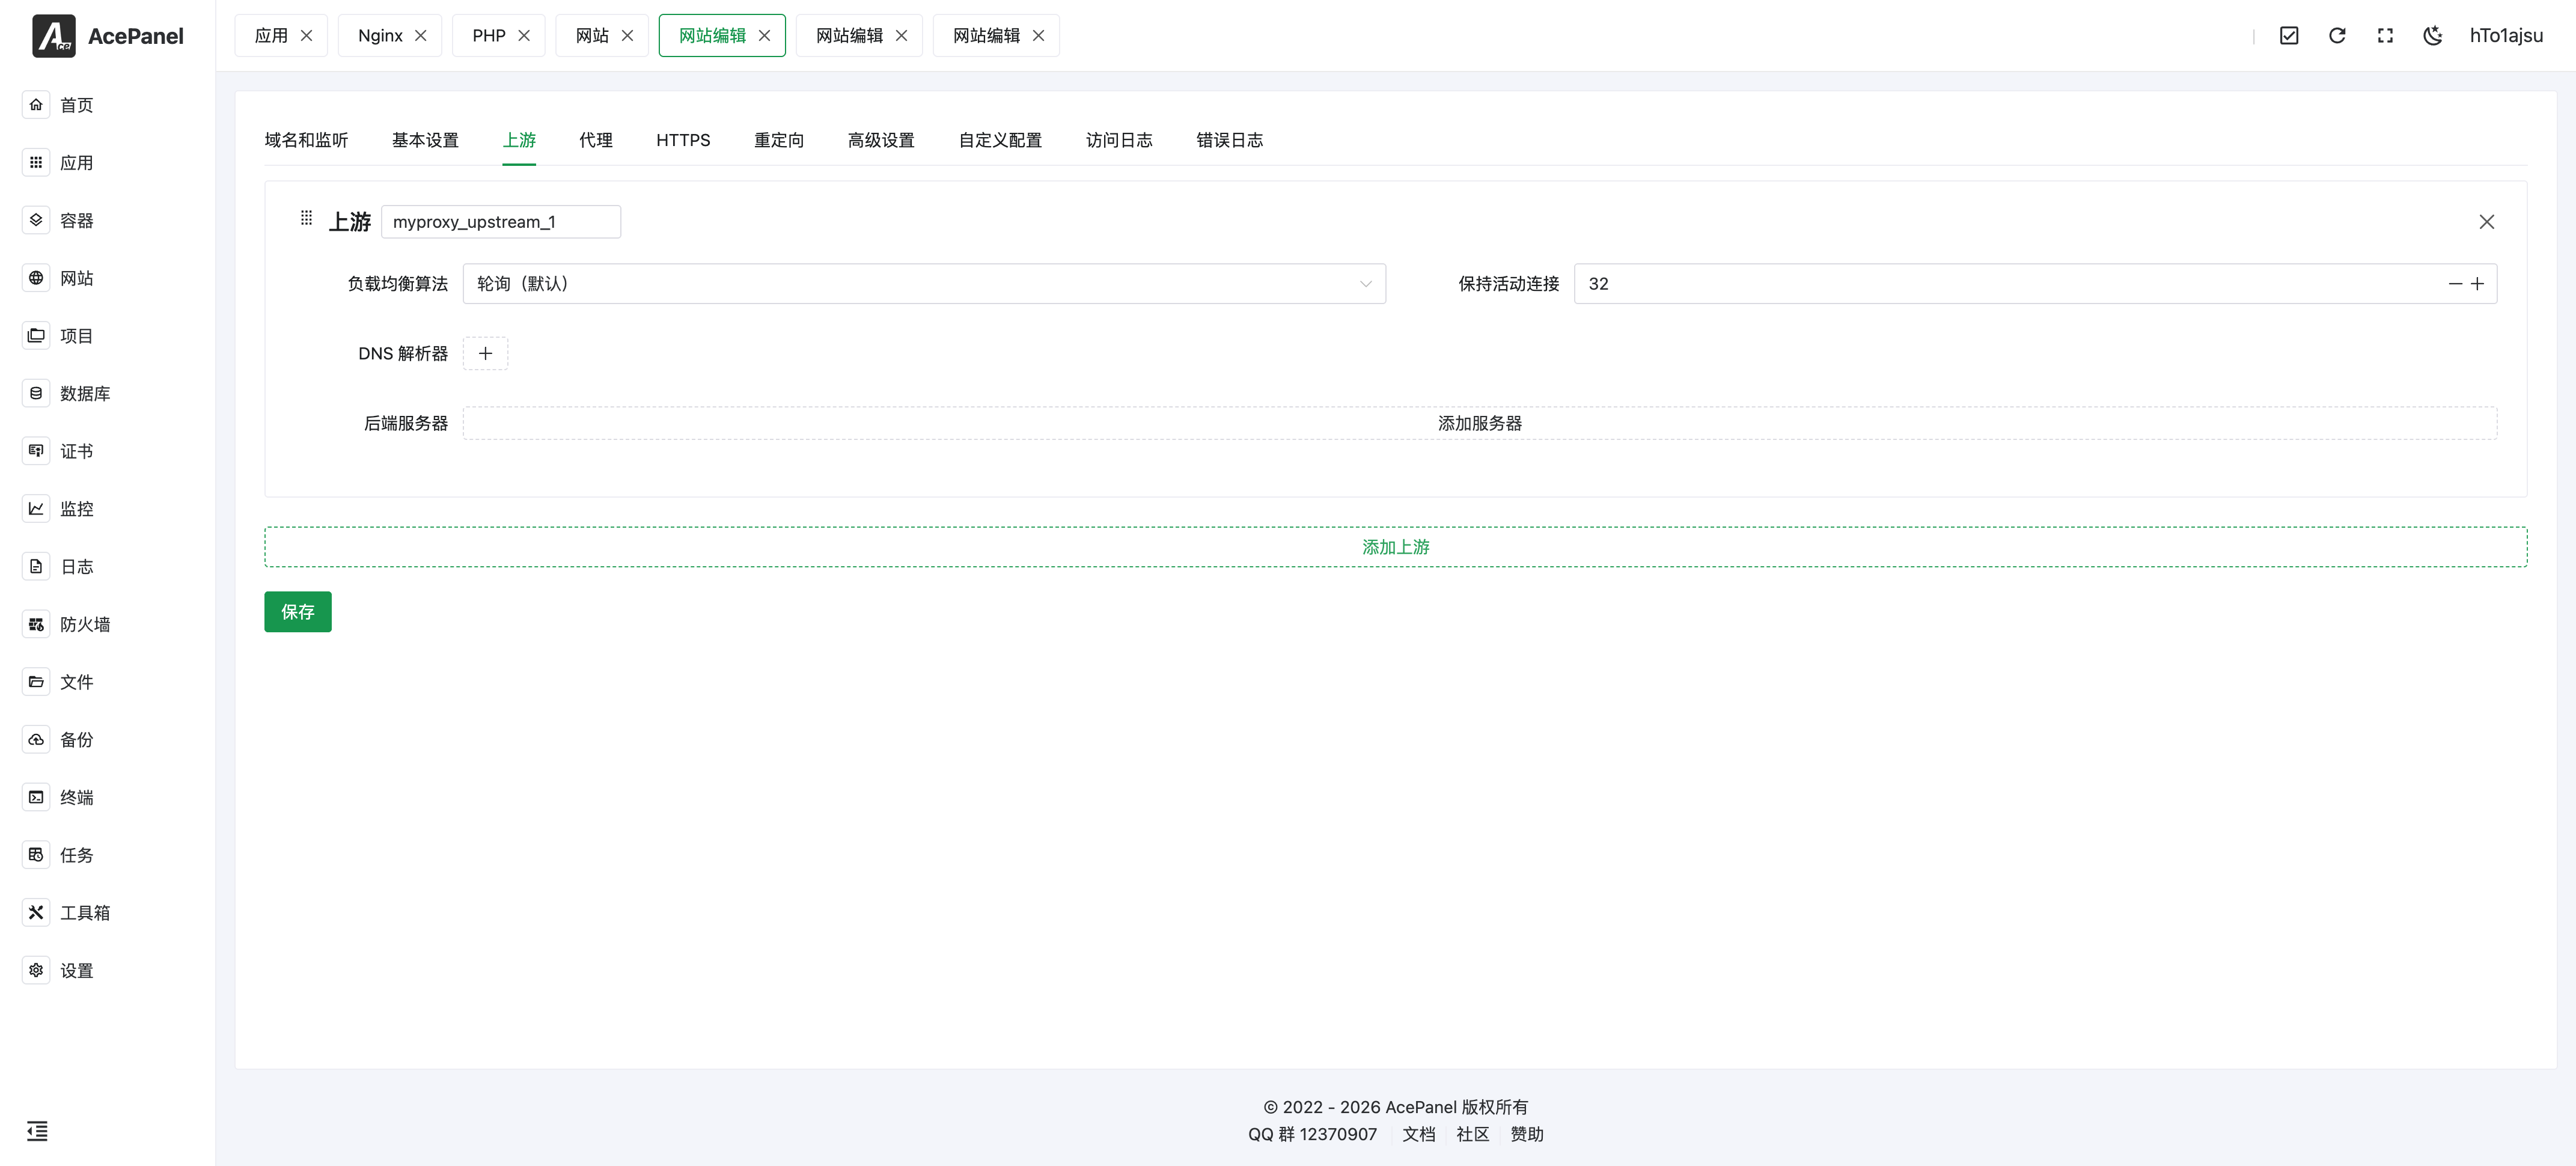
- Upstream Name: Identifier name for the upstream
- Load Balancing Algorithm: For Nginx, supports Round Robin (default),
least_conn,ip_hash,hash, andrandom; for Apache, supports Round Robin (default), Least Busy, and By Traffic - Keepalive Connections: Number of persistent connections to maintain with the backend
- DNS Resolver: Custom DNS resolver and resolver timeout (Nginx only)
Click the Add Server button to add backend servers:
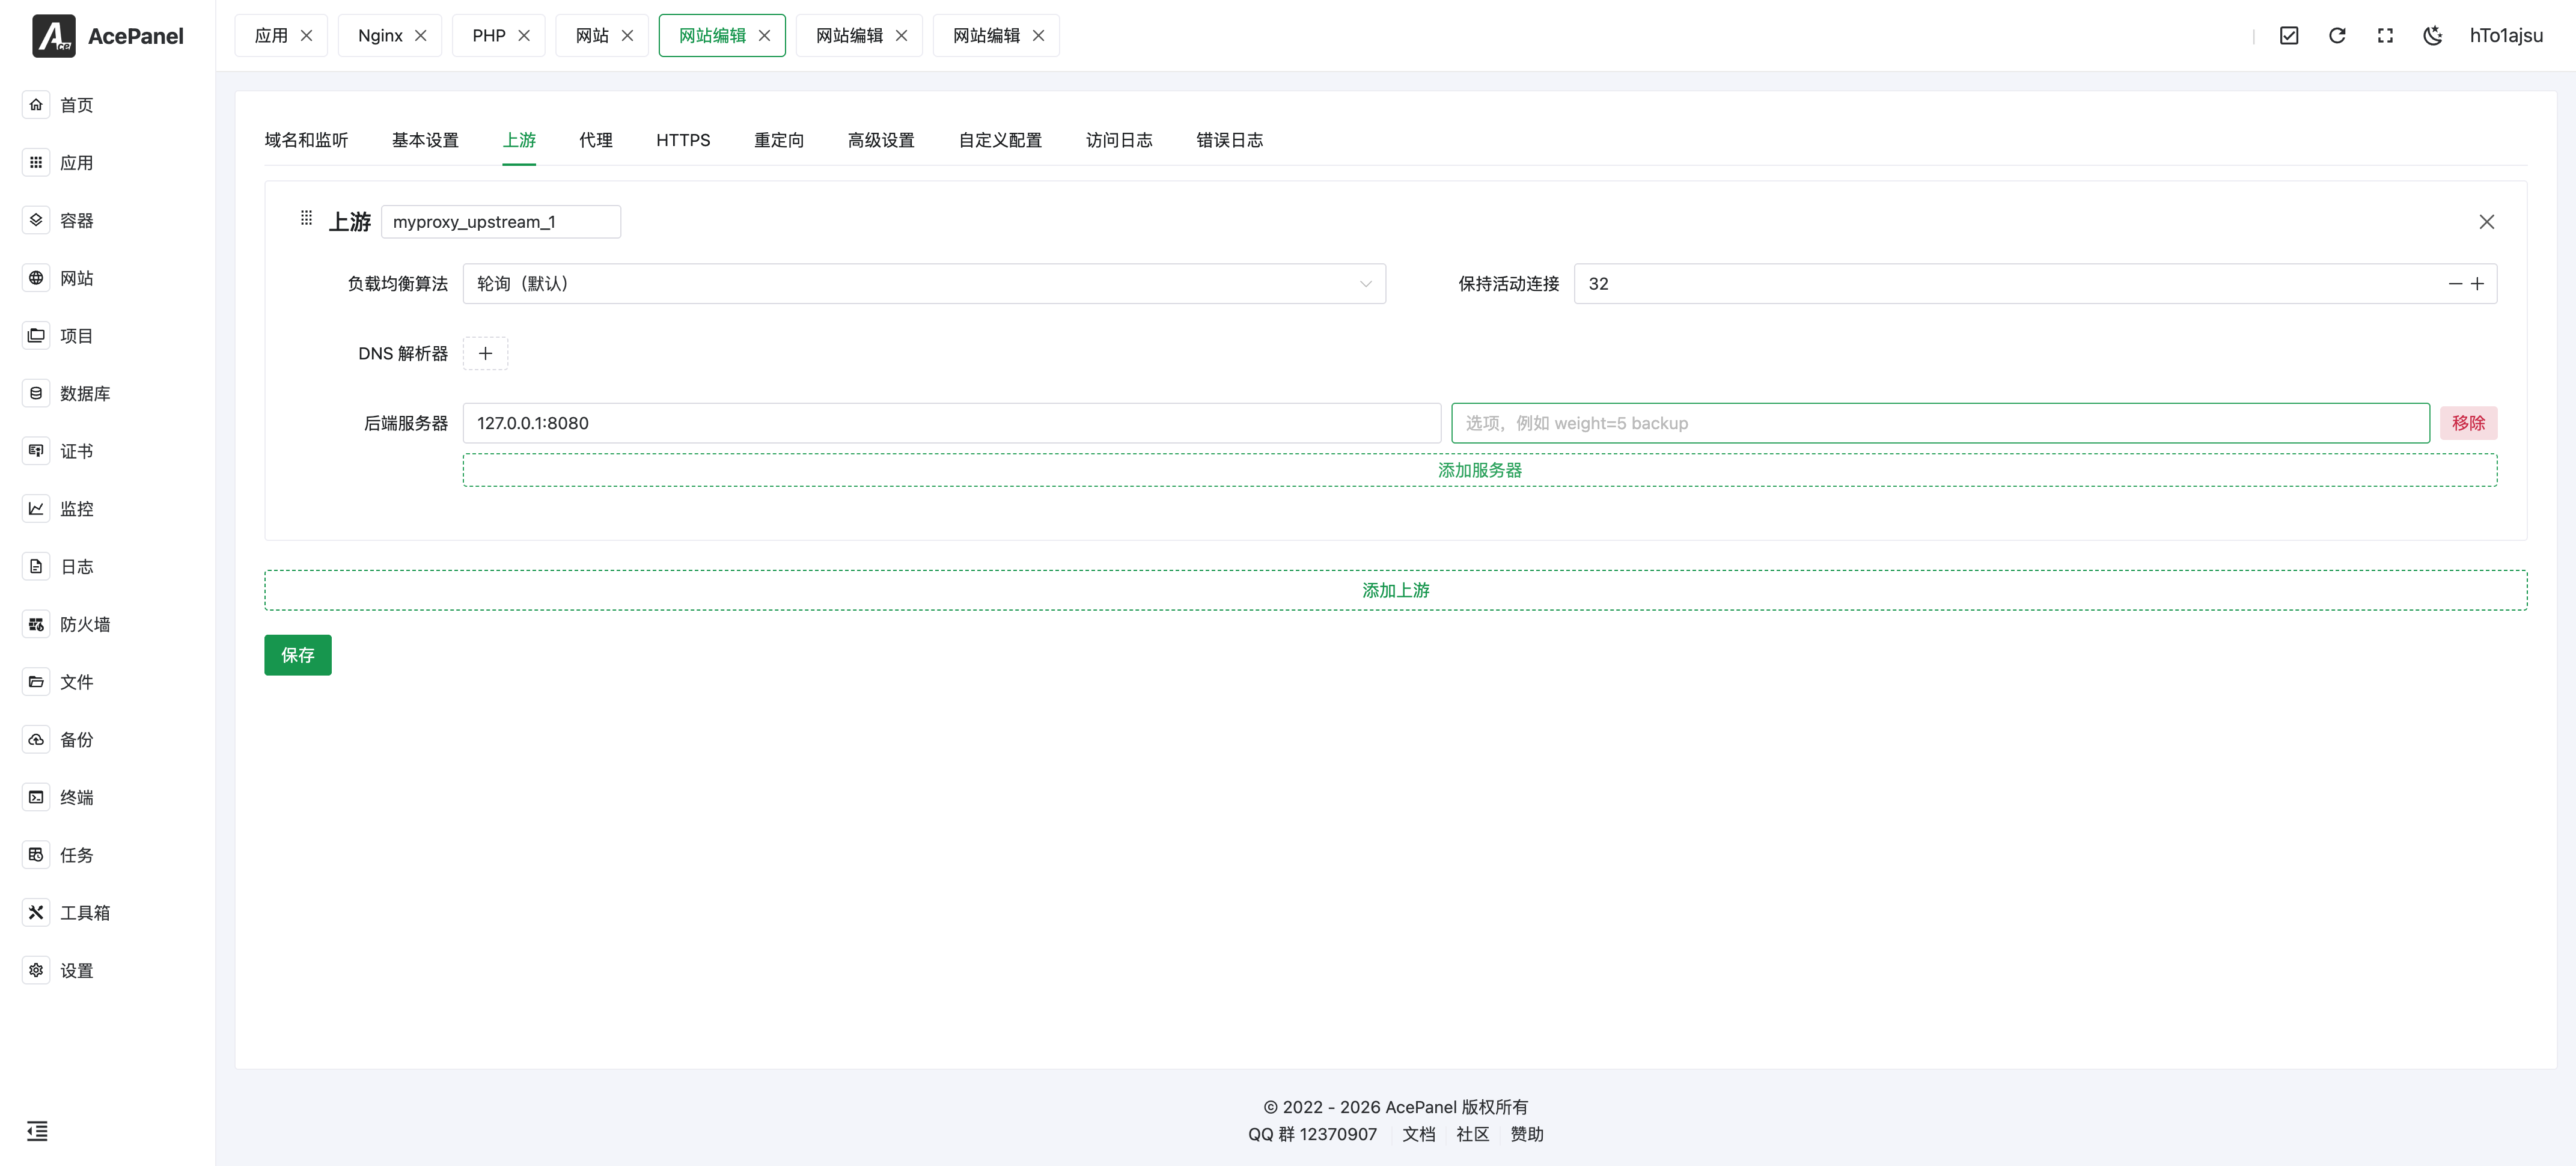
- Server Address: Backend server address, e.g.,
127.0.0.1:8080 - Options: Optional parameters, e.g.,
weight=5(weight),backup(backup server), etc.
Proxy Configuration
Configure proxy behavior and request header forwarding. Each proxy rule maps a location to a backend.

- Match Type: Location match type, such as Exact Match (
=), Priority Prefix Match (^~), Prefix Match, Case-sensitive Regex (~), and Case-insensitive Regex (~*) - Match Expression: URL expression to match
- Proxy Pass: Enter upstream name or directly enter backend address, e.g.,
http://127.0.0.1:8080orhttp://upstream_name - Proxy Host: The
Hostheader sent to the backend (defaults to$proxy_host, or is automatically extracted from Proxy Pass) - Enable Cache: Whether to enable proxy cache
- Enable Buffering: Whether to enable buffering, AI applications are recommended to disable otherwise it may affect streaming output
- Proxy SNI: SNI to send to the backend (only valid for HTTPS backends)
- DNS Resolver: Custom DNS resolver and resolver timeout (Nginx only)
- Custom Request Headers: Add or modify request headers passed to the backend
- Response Content Replacement: Can replace strings in response content
Advanced Settings
For Nginx, each proxy rule also exposes an Advanced Settings panel:
- HTTP Version: Backend protocol version (HTTP/1.0, HTTP/1.1, HTTP/2)
- Max Body Size: Maximum request body size for this rule
- Timeout Settings: Connect / read / send timeouts
- Retry Settings: Retry conditions, max tries, and retry timeout for failed upstream requests
- SSL Backend Verify: Verify the backend certificate (only shown for HTTPS backends)
- Response Headers: Hide or add response headers
- IP Access Control: Allow or deny visitor IPs/CIDRs for this rule
Redirects
The Redirects tab lets you add redirect rules that are applied before the request reaches the proxy. Each rule is a card and rules can be reordered by dragging.
- Redirect Type:
- URL Redirect (
url): Redirect a source path to a target path - Host Redirect (
host): Redirect a source host to a target URL (e.g., forcewwwto apex) - 404 Redirect (
404): Redirect requests that would return 404 to a target URL
- URL Redirect (
- Status Code:
301(Moved Permanently),302(Found),307(Temporary Redirect), or308(Permanent Redirect, default) - Source: The source path (URL type) or source host (Host type); not used for the 404 type
- Target: The target path (URL type) or target URL (Host/404 type)
- Keep URI: When enabled, the original request path and query parameters are kept and appended to the target
HTTPS
The HTTPS tab manages TLS for the website. When a certificate is already bound, a summary card shows the certificate validity period, issuer, and covered domains.
- Main Switch: Enable or disable HTTPS for this website. Enabling it automatically adds a
443listener (andquicfor Nginx); disabling it removes the443listener and clears thessl/quicflags - Use Existing Certificate: Select a certificate already managed in Certificate Management to fill in the certificate and private key
- HSTS: Enable HTTP Strict Transport Security
- HTTP Redirect: Force plain HTTP requests to redirect to HTTPS
- OCSP Stapling: Enable OCSP stapling
- TLS Version: Choose the allowed protocols among TLS 1.0, TLS 1.1, TLS 1.2, and TLS 1.3
- Certificate / Private Key: Paste the PEM certificate and KEY private key contents directly
One-click Certificate Issuance
When the website has at least one domain, the One-click Certificate Issuance button in the footer requests a free certificate for the bound domains. If any domain is a wildcard (e.g., *.example.com), a dialog prompts you to select a DNS provider (configured in Certificate Management) so the certificate can be issued via DNS verification.
Advanced Settings (Site-wide)
The Advanced Settings tab groups several site-wide options into collapsible panels.
Access Statistics
Available for Nginx only. Toggle Enable Statistics to collect access statistics for this website (viewable on the website statistics page).
Log Settings
- Access Log: Choose Disabled (
off), the Default Path, or enter a custom path - Error Log: Choose Disabled (
off), the Default Path, or enter a custom path
When a log path is set (and not disabled), the editor also shows Access Log / Error Log tabs for real-time viewing, and the footer Clear Logs button truncates the currently viewed log file.
Rate Limiting
Toggle Enable Rate Limiting to turn the feature on; the limit fields below appear only when it is enabled.
- Concurrent Limit: Maximum concurrent connections for the whole site (
0= unlimited) - Per IP Limit: Maximum concurrent connections per visitor IP (
0= unlimited) - Rate Limit: Per-request transfer rate limit in KB (
0= unlimited)
Real IP
Identifies the real visitor IP when AcePanel itself sits behind a CDN or Frp (this is different from forwarding headers to the backend; see Forwarding Real IP).
- Enable: Turn the feature on or off
- IP Sources: Trusted upstream IPs or CIDRs, one per line (e.g.,
127.0.0.1,10.0.0.0/8). If using Frp, fill in the Frp IP; if using a CDN, fill in the CDN IP ranges. If unsure you may use0.0.0.0/0/::/0(insecure) - IP Header: The header carrying the real IP, such as
X-Real-IP,X-Forwarded-For,CF-Connecting-IP,True-Client-IP,Ali-Cdn-Real-Ip, orEO-Connecting-IP(custom values allowed) - Recursive: Recursively search for the real IP within the
X-Forwarded-Forheader
Basic Authentication
Add username/password pairs under User Credentials to require HTTP Basic Authentication before visitors can access the website. Leaving the list empty disables authentication.
Use Cases
Node.js Application
# Start Node.js application
node app.js  # Listening on port 3000
Proxy Target: http://127.0.0.1:3000
Docker Container
If the backend is a Docker container, you can use the container's IP address or container name (within the same network).
Proxy Target: http://container-name:port or http://container-IP:port
Multiple Backends (Load Balancing)
Add multiple backend addresses in the upstream configuration to achieve load balancing.
Proxy Target: http://upstream-name
Common Configurations
WebSocket Support
Reverse proxy supports WebSocket by default, no additional configuration needed.
Forwarding Real IP
AcePanel automatically configures the following request headers to pass the user's real IP to the backend:
X-Real-IPX-Forwarded-ForX-Forwarded-Proto
NOTE
This is about forwarding the visitor IP to your backend service, and is separate from the Real IP feature in Advanced Settings (Site-wide). That feature is about AcePanel itself recovering the real visitor IP when it sits behind a CDN or Frp (i.e., reading a trusted upstream header instead of the proxy's own IP). Use Real IP when AcePanel is behind another proxy; use header forwarding when your backend needs the client IP.
Custom Configuration
You can add custom configuration in the Custom Configs tab of the website editor. Each config has a name and a scope (This Website or Global), letting you inject extra directives without editing files manually:
proxy_connect_timeout 60s;
proxy_read_timeout 60s;
proxy_send_timeout 60s;
proxy_buffer_size 64k;
proxy_buffers 4 64k;
Notes
- Ensure the backend service is started and listening on the specified port
- If the backend is a Docker container, ensure the port is correctly mapped or use Docker network
- When the backend service crashes, Nginx will return a 502 error